

这两天刚开始研究OpenCV,刚好碰到同事大牛在搞机器学习的识别的算法库,今天跟他一起研究了一下Object Detection API的安装,并基本测试通过!
网上资料很多,但或者版本老,或者环境不一样,总之整个操作下来坑很多。 接下来我的操作是针对Window平台 (Win7), Python 3 (3.6/3.5)
安装 Tensorflow Object Detection API
建立工程
Object Detection API 对应的源码位置为https://github.com/tensorflow/models,可参考安装文档 https://github.com/tensorflow/models/blob/master/research/object_detection/g3doc/installation.md
新建Tensorflow文件夹,将https://github.com/tensorflow/models 下载放在Tensorflow目录下。我习惯git同步,可以用下面命令把代码git到本地
git clone git@github.com:tensorflow/models.git
安装Tensorflow及依赖库
首先安装Tensorflow, 命令如下
# For CPU
pip install tensorflow
# For GPU
pip install tensorflow-gpu
安装依赖库
pip install Cython
pip install contextlib2
pip install pillow
pip install lxml
pip install jupyter
pip install matplotlib
编译 Protobuf 依赖包
Tensorflow Object Detection API使用Protobufs来配置模型和训练参数。在使用框架之前,必须编译 Protobuf 依赖包。在 tensorflow/model目录运行命令:
cd models/research
protoc object_detection/protos/*.proto --python_out=.
这条手册上的命令很有可能会让你碰到两个问题:
- protoc 命令无法执行,因为没安装
- object_detection/protos/*.proto: No such file or directory
安装 protoc
下载地址: http://code.google.com/p/protobuf/downloads/list,估计你也上不去,可以直接从protocbuf的github网站下载https://github.com/protocolbuffers/protobuf/releases
首先下载protobuf-all-3.6.1.tar 和 protoc-3.6.1-win32.zip 两个包。分别解压到各自目录。
接着将protoc-3.6.1-win32.zip中的protoc.exe拷贝到c:\windows\system32中。
这样protoc命令找不到的问题就能解决了。
object_detection/protos/*.proto: No such file or directory
这个问题是Object Detection Module的一个bug,说明如下
This is a typical bug of the object detection module working in Windows. Here are detailed discussion #1591.
A solution is to compile those .proto files one by one. You can write a batch to run.
所以我就简单做了个批处理脚本运行
protoc object_detection\protos\anchor_generator.proto --python_out=.
protoc object_detection\protos\argmax_matcher.proto --python_out=.
protoc object_detection\protos\bipartite_matcher.proto --python_out=.
protoc object_detection\protos\box_coder.proto --python_out=.
protoc object_detection\protos\box_predictor.proto --python_out=.
protoc object_detection\protos\eval.proto --python_out=.
protoc object_detection\protos\faster_rcnn.proto --python_out=.
protoc object_detection\protos\faster_rcnn_box_coder.proto --python_out=.
protoc object_detection\protos\graph_rewriter.proto --python_out=.
protoc object_detection\protos\grid_anchor_generator.proto --python_out=.
protoc object_detection\protos\hyperparams.proto --python_out=.
protoc object_detection\protos\image_resizer.proto --python_out=.
protoc object_detection\protos\input_reader.proto --python_out=.
protoc object_detection\protos\keypoint_box_coder.proto --python_out=.
protoc object_detection\protos\losses.proto --python_out=.
protoc object_detection\protos\matcher.proto --python_out=.
protoc object_detection\protos\mean_stddev_box_coder.proto --python_out=.
protoc object_detection\protos\model.proto --python_out=.
protoc object_detection\protos\multiscale_anchor_generator.proto --python_out=.
protoc object_detection\protos\optimizer.proto --python_out=.
protoc object_detection\protos\pipeline.proto --python_out=.
protoc object_detection\protos\post_processing.proto --python_out=.
protoc object_detection\protos\preprocessor.proto --python_out=.
protoc object_detection\protos\region_similarity_calculator.proto --python_out=.
protoc object_detection\protos\square_box_coder.proto --python_out=.
protoc object_detection\protos\ssd.proto --python_out=.
protoc object_detection\protos\ssd_anchor_generator.proto --python_out=.
protoc object_detection\protos\string_int_label_map.proto --python_out=.
protoc object_detection\protos\train.proto --python_out=.
运行完成之后,对应的python文件就生成了。
注意: 运行上面命令时,不要在protos目录编译,安装手册步骤,在research目录下,运行protoc object_detection\protos\?.proto,否则会有一些文件依赖相关的报错
在上面的过程中,我们并没有去编译protobuf-all-3.6.1.tar这个包。我也刚开始研究这个库,所以还不确定它跟tensorflow下面的proto内部是否完全一致,但是它不影响接下来的基本测试,不过,我还是在这儿介绍一下它的编译方法,有两种(网上学习到的,待验证)
1.跟前面一样,用protoc编译
2.如它tutorial里说的一样,完全可以拿它编译好的python文件
For non-C++ users, the simplest way to install the protocol compiler is to download a pre-built binary from our release page: https://github.com/protocolbuffers/protobuf/releases
直接进行python安装
python setup.py install
注意: protoc下载的文件里面也有protobuf,这个用不到,不要去编译它protoc-3.6.1-win32\include\google\protobuf
特别注意的是,关于这一步网上有的人给的方案是让你直接用编好的protos文件,但这很有可能会出现版本匹配的问题,这都是血的教训。
为依赖包添加环境变量
将models\research和models\research\slim添加到环境变量,可以有几个方法
1.函数添加
import sys
sys.path.append("c:\\")
这需要去改启动脚本,我这儿只是想完成安装,所以不是优选项
2.修改环境变量
用户可以修改系统环境变量PYTHONPATH,因为我是用virtualenv建的工程,还不知道怎么去添加它
3.增加.pth文件,推荐!
在site-packages添加一个路径文件,如oda.pth,该文件必须以.pth为后缀,在文件里写上你指定访问的python库位置,如下:
E:\Computer\virtualenv\oda\models\research\
E:\Computer\virtualenv\oda\models\research\slim
测试
运行下面命令
python object_detection/builders/model_builder_test.py
如果正常的话你看到的结果应该如下
models\research\object_detection\builders>model_builder_test.py
......................
----------------------------------------------------------------------
Ran 22 tests in 0.438s

OK
运行 Jupyter notebook demo
启动Jupyter
cd tensorflow/models/
jupyter notebook
它会启动浏览器窗口,进入object_detection文件夹打开object_detection_tutorial.ipynb ,运行该文件Cell -> Run All
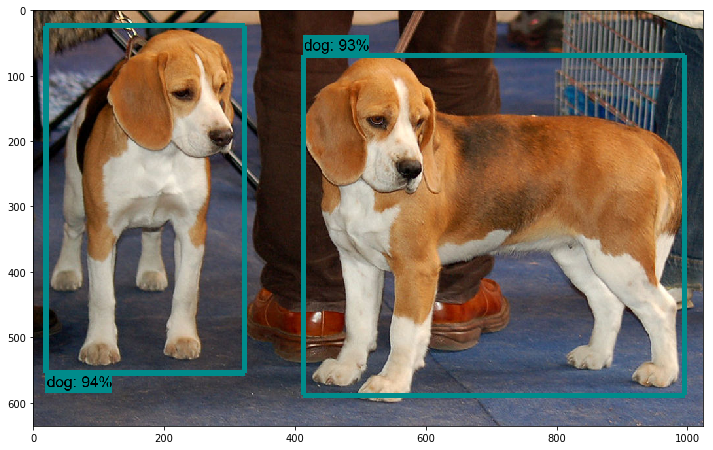
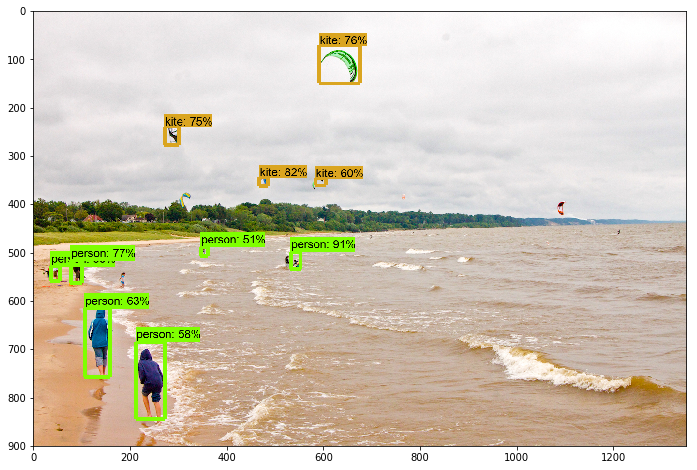
耐心点,几分钟之后(i5机器,不带GPU)你就可以看到结果了。如果是i3机器,那你必须得升级了。
显示效果如下
接下来,开启你的Object Detection之旅吧!
